
Best way(s) to get and keep your ME dog vertical:
This one is great for veterinarians and owners if they’re not already familiar with vertical/upright feeding and the Bailey Chair. It shows how their quality of life can allow them to do almost anything others dogs do except when it comes time to eat. Using the Bailey Chair to achieve the proper position allowed the food to move down to Roxie’s stomach which in turn gave her strength and stability to compete at highest levels in agility. She is one of the best examples of demonstrating how proper management can help overcome obstacles of having a special needs dog.
http://www.youtube.com/watch?v=VoKQmrJBXXI
10 minute video clip of Roxie’s story with MG/ME and that there is quality of life for our fur babies.
Measure your dog to get proper chair built:
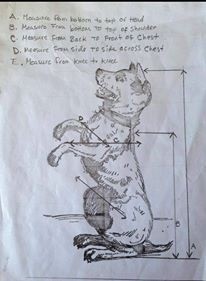
– Will take two people – one to hold your dog up and one to measure.
– Put in a corner and with 1 side touching a wall, lift both paw’s up in a sit position.
– Make sure the back is touching the back wall so sitting up vertically (best to pull tail forward between legs since that’s how the chair will be used).
– Measure for height – measure from the floor up to where paw’s would comfortably rest on the paw rest -(measure to the bottom of the paw’s)
– Measure for depth – measure out from the back wall to the deepest point of the chest.
– Measure for width – measure out (from the front of her body) from the side wall across to the opposite side of the chest.
Get a chair or use alternative idea that keeps your dog vertical:
– Below is a simple drawing of what your pieces look like to make a chair
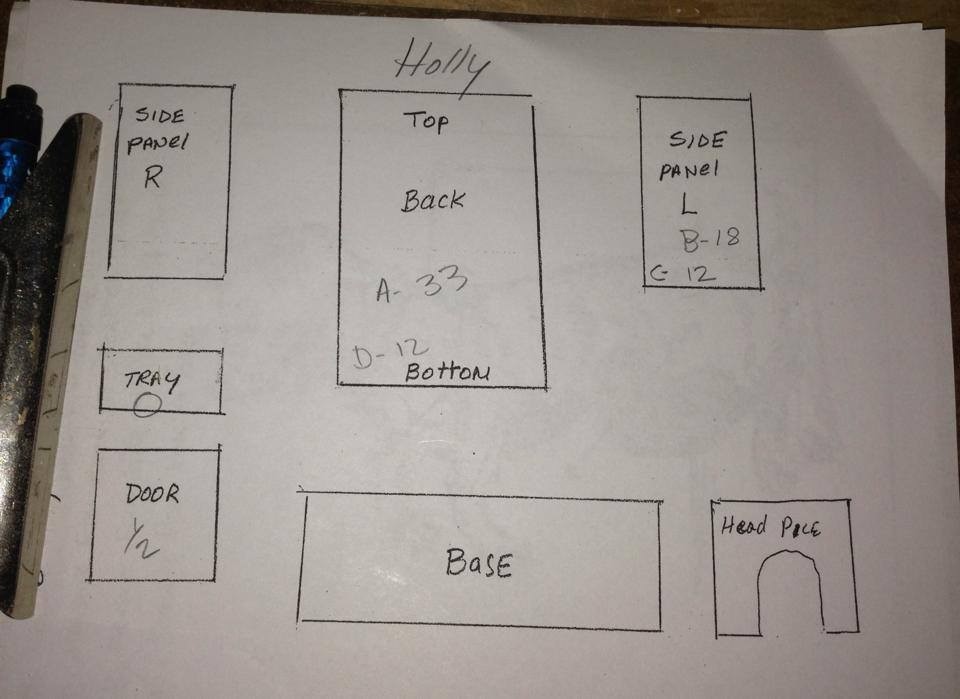
– Can have a chair built for you by a family member, friend, or someone who has carpentry skills.
– Build a chair yourself.
– Can use alternatives to and actual “chair” but dog must fit properly and be vertical (See the chapter called Feeding, Creative Feeding Ideas for great pictures of how other have gotten their dogs successfully vertical).
– Here is a modified version of Happy’s chair:http://sites.google.com/site/jansmitfamily/home/happy_the_labrador/happy-s-modiffied-version-of-a-bailey-chair.
– For the technical Drawing, I’m not an artist, but all the detail is there and as we are from South Africa all dimensions are in Millimetres: http://docs.google.com/viewer?a=v&pid=sites&srcid=ZGVmYXVsdGRvbWFpbnxqYW5zbWl0ZmFtaWx5fGd4OjRjN2M1Nzk5MzQ3MGZjZWQ.
– Can try a child’s care seat that would accommodate a child up to 70lbs.
– Front facing baby carrier – allows you to carry your dog around while moving about; works great for small breeds or puppies and especially if they require long hold time afterwards (ylou can do things with your hands while wearing your dog).
– Kelty backpack carrier – works as a free standing chair that can be carried or strapped to a straight back chair; best of all, it has a great internal harness that doesn’t allow wiggling out of it and has a comfy padded seat; also has a great internal harness.
Products to use for padding inside the chair or alternative “container“:
– Nice soft cushion – place a pillowcase over it, so the actual surface may be easily washed and replaced; also helps protect against bacteria since it can be cleaned
– Foam noodle (swimming product) to pad the back and sides of the top edge…often, they like to rest their heads after eating and it is nice to have a little foam cushion.
– L-brackets to affix the sides and back to the bottom which was quick and easy to assemble.
– Boat upholstery to line the inside and then added pads made with closed cell foam (like a raft) to add thickness inside and on the bottom. Both the foam and upholstery were easy to wipe clean.
– Use a towel on each side – can roll them up for top of sides and fold in half then draped down the insides
– Vinyl BUT this surface can get very hot and if you use tacks or staples to attach it…..be VERY CAREFJUKL your dog does not pull at or eat them.
How to get a dog to get into a chair: It just takes patience and a “tough love” approach. I think most of us encountered a bit of resistance in the early days….! But it just takes perseverance and tenacity. Everyone thinks their dog will never tolerate the chair, but that is not the case. Also don’t just assume your dog isn’t interested in getting in a chair. There might be some other issue so may need to discuss with your veterinarian. Below is how some owners have accomplished this:
1. Roxie stands in front of her chair on all four paws. (The paw rest/roll bar is out at the time. It just slides out, upward.) I put a small amount of her liquified food on my finger to position her directly in front of the chair. She then backs into her chair and raises herself up onto her back legs. (I’ve heard others describe that motion as well.) I trained her to back in with the food on my finger. You could always lift up your dog’s front paws yourself if need be. Basically, with food as a motivator, it wasn’t difficult for her to learn.
2. After your dog is in the chair, raised up, you slide the paw rest/roll bar into place. This is there so that the dog is comfortable and so that your dog stays in place. The dog must be perfectly vertical for the best possible chance to avoid aspiration pneumonia. You will note in Roxie’s video that we have a cushion on the bottom for comfort and so that her paws are not stretching upward. (The chair was a bit tall due to my poor measurements.) That wouldn’t be comfortable. Likewise, the paws shouldn’t be in a downward angle or the esophagus won’t be vertical. You will also note that I have a cushion in the side/back as well. That’s because my measurements weren’t too accurate in that area either.
3. Getting in and out is done as described above. Once your dog sits for at least 20 minutes after eating, you simply slide the paw rest / roll bar upward. I help Roxie’s front end reach the floor. While she certainly would have no problem with gravity doing it for her, I’m always careful as she is almost 12 years old and she has had back issues in her past.
What if your dog like to jump out of the chair: This is for those dogs who seem to be able to jump out, or at least continue to try their best and are able to get out. Find a distraction to keeps your dogs attention.
– Lick the bowl (there is really nothing to lick) when he starts getting antsy
– Watch doggy pals while they eat or move around
– Find a TV station or show your dog likes; several have used Animal Planet or other dog specific shows
– Try carefully allowing to lick something like Frosty Paws”
– Set a timer that clicks down then rings/buzzes
– Use a K9 Floatcoat (www.ruffwear.com) and a slight lift with a tether and D-ring
For anyone with concerns about use of the chair for dogs with either spine or hip problems – a few thoughts:
– Consider use of a K9 Floatcoat to add support and a possible means of rigging a little upward traction to relieve pressure (see www.ruffwear.com)
– Remember you have to prioritize. You might have to help your dog deal with a little discomfort at first, but avoiding aspiration pneumonia is a priority.
– A few folks compensate for their dog’s positioning by tilting the chair backwards . Look for other ways to be creative
From an ME owner: “I have a (almost) 10 year old GSD-Golden Ret mix, Padgett who also has arthritis in his hind quarters. He can’t do the traditional ‘beg’ position. We built our Bailey chair, but built a low seat in it, with a gap out the back for his tail to go out behind him. So when he sits in his Bailey chair, his butt is on the seat and his back legs are out in front of him, feet on the floor (like a person sitting in a chair). This way does not appear to put any weight on his legs but is instead just on his butt, and he appears to be very comfortable.”
Owners story about training to use a chair: My dog is finally using the chair about a month and a half after diagnosis and not quite a month after the Moors gave it to me. My dog is very gentle, yet circumspect about new things. This is what we did:
1. He was eating in a sitting position, and staying sitting for his “wait period.”
2. I backed him into the chair, and he sat (same doggy sit) for eating and waiting, the only change was that he was backed into the chair for it. If your dog doesn’t like being confined, he will have his head out in front of the “box” part and his rear end in it. Since he’s eating, he may become okay with this situation.
3. After eating, we would practice being held up in the “begging” position. At first for just a minute or so at a time.
4. Gradually, gradually worked our way up to sitting “up” for 5 minutes,
5. Then tried putting the bar in for another 5. This is when we had “fast moves” and other things that meant we might be moving too fast. If so, we backed down on the time immediately and had shorter goals, maybe w/o the bar the next time.
6. When he would sit “up” for 10 minutes after eating, and without any kind of fussing, the next meal we just started feeding him in the “up” position without further ado.